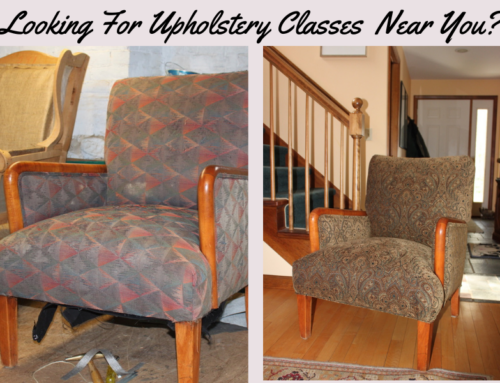
The right tool for the job
The art of upholstery has been around for several centuries, and the original tools have changed very little.
Although there have been a few modern changes over the years, such as pneumatic staplers and walking-foot sewing machines, the most often used upholstery tools remain the same.
Upholstery is one of those fields that does not require you to continually buy new tools as long you buy the right ones to start with. Of course, there are always the fun add-on items as your upholstery skills grow that you decide you “MUST” have… lol. Every custom workroom has to have a few extra special tools.
Don’t forget to check out our PDF downloads for tools and other great information.
Note: Some of the links in this blog post may be affiliate links. If you buy products using these links I may receive a small commission.


Have you ever heard the term “spitting tacks”?
Spitting tacks is exactly what upholsterers used to do, and that is how I also learned to upholster. Yep, you put a small handful of upholstery tacks in your mouth and use a magnetic upholsterer’s tack hammer to retrieve them from your mouth. Then, tap them into the furniture frame. Every once in a while, the tack stays on your hammer, and when you go to retrieve the next one….OUCH… you guessed it, the tack is now attached to your lip. I confess that this has happened to me.
So, I am happy to say that about 18 years ago, I bought my first air compressor and a pneumatic staple gun. This girl will no longer have swollen lips.
Having a pneumatic staple gun not only saves you from a funny-looking smile and makes your dentist happy, but it also saves you a bunch of time. My preferred staple gun is a long nose. I have a Fasco, Sailrite, and a TacWise and find them very good products. You will find that the shortnose guns are difficult to get in some of the areas we need to reach when attaching fabric, but the long nose can do just about anything you need it to do. It is a must-have in my book. I still use the magnetic tack hammer to add decorative tacks to my projects, so it is a tool you want to have.


Tear down is the dirty part of the process.
Yes, you do a lot of staple removing as your upholstering as well as the teardown and there is no way to avoid it. Get over it, as it’s part of the fun, right? An Osborne 120 ½ staple lifter or puller as I call it is a must-have tool for the job. The 120 ½ allows you to get under the edge of the staple and pry it out of the wood. Along with this, you will want a pair of worn out wire cutters because those little 7 series staples can be stubborn when it comes to removal. There are a few other Osborne tools for removing fabrics and staples such as the ripping chisel, 124 staple remover tool, and the 200 Claw tool just to name a few. Once you’ve acquired the right tool for the job you will see how it helps make the job a little easier.


Good fabric scissors make for a happy workroom
For me, the fun begins when you get to start upholstering the piece and put it all back together using new materials and beautiful fabrics. (For information on what supplies to use check out my post on “Which Upholstery Supplies Should I Use” ) For this part of the process, you will need a gooseneck webbing stretcher, a good pair of heavy duty scissors, one pair to cut fabric and one pair to use for webbing, burlap and such. Anyone who works with fabric knows that you ONLY use your fabric scissors for FABRIC! Your family is usually well aware of this rule too. This is also where the pneumatic stapler comes into play instead of spitting tacks. Another must-have tool is an upholsterers regulator. This tool is like having an extra hand and fingers so tiny you can get into any space. You will really be surprised as to how often you use this little gem. Oh, you will want a few specialty needles as well. A package of Osborne’s curved needles is a definite along with a 12” button needle. This combination of needles will get you through most of the task’s you run across. The smaller curved needle will be used for instance when you need to hand stitch areas closed using the wonderfully useful ladder stitch, many who come from a custom workroom background making drapery find the curved needle odd to use but once you’ve tried it you will love it. The larger curved needles such as the 6” will be used for sewing springs to the jute webbing and hand stitching the deck seam to the burlap.


Making buttons can be fun!
One specialty tool that you will want to invest in if you are going to do a lot of this type of work is a Button press. The press itself is not very expensive, but the dies and cutters to make the buttons do add up. Button dies come in several sizes ranging from a #22 being about ¼” all the way up to a # 60 at 1 ½” in diameter. The most often sizes you will use in upholstery are the #22, #30 and #36. For over 15 years I got away with just having the #22 and the #30. As a girl who loves tools I did add the “45 several years ago for decorative pillows and then the #36 which is about ⅞” in diameter and I love it for tufting. I most recently purchased, and really don’t NEED it, the number #60…. Just for FUN (don’t tell Bill I don’t need it, OK) !!
Having the button press and a couple of the smaller dies to get started will give you a much better quality button than the hand pressed kits.
You can find these oftentimes for sale second hand so if you do come across one with dies and cutters grab it!


Love my Juki DNU 1541s
Lastly, you will need a sewing machine. I think this is the biggest question our members have “what sewing machine do I need?” The most important thing to consider when you are on the hunt for a sewing machine is a Walking Foot sewing machine. This is NOT an attachment but a type of sewing machine. With a walking foot sewing machine, the presser feet come in two parts. The center portion of the foot moves up and down as you sew and works with the dog feed to move your fabric through as you sew allowing the top and bottom layer of fabric to feed evenly. This is one of the secrets to no more puckers, along with experience and honed sewing skills. So now you know what type, what brand you ask? Well, there are many good brands and an industrial would be my suggestion. I have a Juki DNU 1541s and two other Juki’s so you can tell I am partial to this brand. That is not to say that other brands aren’t good. Brother, Consew, and Pfaff also make industrial walking foot machines. Buying a sewing machine is an investment so I would buy the best you can afford and one that you can get replacement parts for. An industrial sewing machine, if used correctly will need very little in terms of repair but you do need to oil and clean them regularly.

Now for the fun tools that make things even easier!
So those are the main tools that you need now let’s talk about the fun to have tools that you can add as you go. My newest favorite is the Osborne tucking tool. I never thought I needed one until a student in one of my hands on workshops introduced me to one…. I LOVE IT and don’t know how I survived for 20 years without one. It saves your fingers when tucking fabric in those tight spots or areas hard to get at. A square point knife by Osborne is another handy little tool used to cut edge roll.
If you turn your love for upholstery into a business you will want to invest in a few more expensive tools.
First would be a foam saw, you can easily get away with using an electric carving knife found in the kitchen department, but once you use a foam saw you too will want one. The foam saw will save you time and produce a much cleaner cut and easily pay for itself in no time. Lastly would be a Klinch-It tool.. What the heck is that, right? Well, it is this very handy, not fancy looking tool that attaches coil springs to the support system. This saves you time from hand sewing the springs down,which is perfectly acceptable, and when you have a sofa with 48 springs in the seat you will wish you owned one of these. These aren’t cheap so this is probably something you will not purchase unless you are making a living doing upholstery.


So there you have it, all the tools you will need to get this party started!
The main tools we mentioned:
- air compressor
- pneumatic staple gun
- staple pullers
- regulator
- scissors
- webbing stretcher
- needles
All of this will cost you less than $500!
The button press with the two smaller size button dies and cutters will run around $300 but you may be able to find a used one and save you some money. Finding a second-hand sewing machine is a possibility too, but if you can’t find one used, a new industrial walking foot machine for under $2000 with a table. So as you get started, remember to buy the necessities first and as you expand your love for upholstery then you can add on the “must” or “just because” tools.
See you on the inside,
Kim
PS: If you need help honing your skills or learning how to use the tools, be sure to check out our membership and all it has to offer. With over 90 Video Titles, 350 plus tutorials, and a community full of your peers, you won’t want to miss out and be left behind!