Kim and I were recently hired to re-upholster and repair a couple of Victorian Chairs that were used as part of a wedding ceremony. One of the chairs was very loose and in rough shape. As I began to tear the old fabric off the chair it was starting to look like the fabric was about the only thing holding this chair together.
Most of the joints were loose, some of the wood in areas where Kim needed to re-attach the fabric was missing and there was a big break in the decorative wood that surrounds the back.
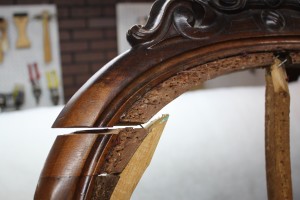
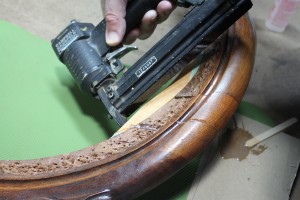
Once I had all the fabric and stuffing off the chair I had a more clear idea of exactly what needed repair and how I would make those repairs. The first thing to take care of was the break in the decorative wood. That repair would require that the chair remain untouched for several hours while the two part epoxy cured. Lucky for me the break in the wood was pretty clean so there wasn’t much to do other than add the epoxy, secure the piece with a couple of brad nails, and set it aside to cure.
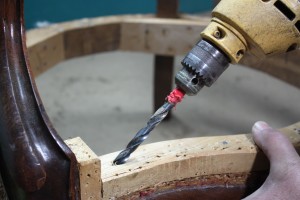
Next were the loose joints at the rear legs where the legs passed through the bottom rails. I decided to drill holes at each joint and glue in a a 3/8″ dowel to secure them. I pre-drilled the holes with a 3/16″ drill bit and then switched to a 3/8″ bit. If I had just started drilling with a 3/8″ bit I would have risked splitting the wood.
Moving on to the joint where the front bottom rail meets the front legs I had the same problem. Two more dowels and a bit of glue and we are all set. A little further up the chair where the arms met the back and the front legs we installed more dowels.
Once all the glue had dried I used my fine cut double pull saw to cut off all the dowel ends eliminating any lumps under the padding that might have been created by them.
The center back support was broken at the top and bottom so a new piece would have to be made. I had a piece of hard wood, Ash, on hand so I marked out the piece I needed and cut it on the bandsaw.
Next I set it in place and drilled pilot holes for the 6d x 2″ nails I was going to use to fasten the back support in place. Using an Osborne split head hammer I set the nails securing the wood in place.
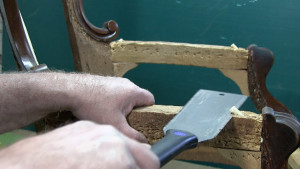
The wood just inside the decorative wood where the fabric gets attached was very beat up and some of it missing. This would have to be repaired or replaced before any new fabric could be put on.
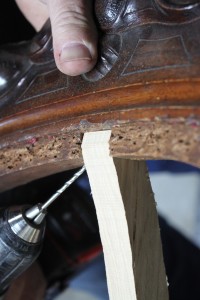
Where the wood was missing I fashioned a small block of wood to replace it then epoxied it in place securing it with a couple of staples to hold it while the epoxy cured.

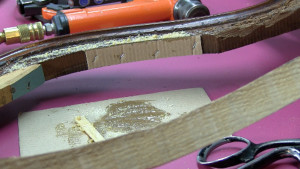
In another spot where the wood was missing I cut and attached a piece of cardboard to create a dam that would hold a mixture of epoxy and sawdust until it cured. Other large holes and weak spots were filled in with a mixture of wood glue and sawdust giving Kim a good place to attach her fabric with staples.
Finishing off the decorative wood was done by first going over the finish with #000 steel wool followed by a liberal coating of Old English for dark wood to color in the scratches. Once that was dried I gave the wood a few coats of H. Behlen Jet Spray Lacquer Toner in Dark Mahogany.
List of Materials used:
- 2″ 6d nails
- 3/8″ birch dowels
- wood glue
- slow cure epoxy
- Ash and Poplar woods
- Behlen Jet Spray Lacquer Toner in Dark Mahogany
- Denatured alcohol for epoxy clean up
Tools Used:
- 3/16″ drill bit
- 3/8″drill bit
- 3/8″ electric drill
- double pull saw
- Campbell Hausfeld brad nailer
- #000 steel wool
- any hammer