Oh boy . . . If I had a dime for every time a client or student said that I think I would be rich!
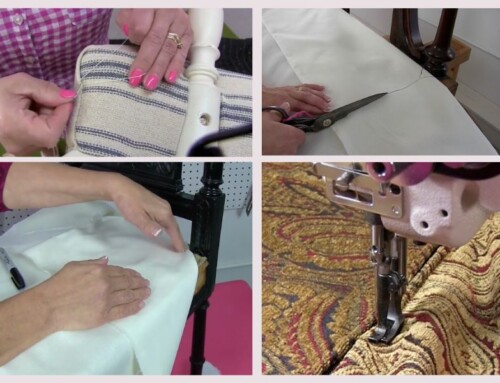
This vintage barrel chair is not the hardest of upholstery projects, but it is a tough one if you don’t have the right knowledge. I chose this vintage barrel chair because many of our online class members had been asking “How do you upholster an inside curved back?” and this was just the project to show them how.

Here is the new tutorial “How To Upholster A Vintage Barrel Chair” (This video teaches you just how to deal with an inside curved piece)
Thank you for leaving me two layers to remove!
Tearing down the piece was a dirty job as most of them are. This barrel chair had been upholstered a couple of times. As I find way more often than I would like, the last upholsterer had not removed the old padding before adding new. The springs had not been retied but they had added sagless over the top of the existing jute webbing to ensure the springs were supported from underneath, Thank you for leaving me two layers to remove!
You wouldn’t want your mechanic to change your oil filter and put the old oil back in your car, would you?
As is common in older pieces there were several products making up the padding of this chair (you can see them in the pictures below). There were a couple of different layers of Coir which is coconut followed by several layers of cotton. The original layer of cotton was followed by a muslin cover. On top of the original muslin, the next upholsterer added more cotton. I also found a few chunks of foam they added to build up the failing support system, which rightly should have been replaced. If you’ve watched any of our videos you know I say to do it right the first time which is what we have always done here at Kim’s Upholstery when upholstering pieces for our clients. You wouldn’t want your mechanic to change your oil filter and put the old oil back in your car, would you?


Now the chair was ready to be made new again!
After tearing out all the old materials, I stripped and sanded the frame down and painted it with a Gray Rusteum Chalk paint. Then I went over the gray with white milk paint using a dry brush technique. Not wanting to really cover the gray but just highlight the details of the frame and I give it a light whitewash effect. Don’t you love the way it turned out? I will definitely do this treatment to there furniture in my home.


Trust your eye. . .
I chose a beautiful fern and floral print for the inside back and arms. As you can see the inside arms and back are sewn and attached to the chair in one piece. The seat and outsides of the chair were done in a solid green velvet which picks up the green in the ferns. I love mixing colors and fabrics together. Usually, one piece of fabric will speak to me and then I use it as my inspiration to pick out the other fabrics. In this case, the print fabric was my inspiration. When I first chose the print my eye said to go with blues as a companion. Dark blues seemed to take away from the cheerfulness of the print and teals just didn’t look quite right. Then I found the green!!! Yep, that one was the keeper! Trust your eye.

I love how the fabrics and paint finish look on this piece!
Be sure to take a look at all the other videos available in our membership. With over 70 tutorials you’ll want to make a bowl of popcorn to enjoy while you are binge-watching.


Wow… great work. Big like!
Great advice about the fabric choice, I’ll keep it in mind. So true– trust your eye! Love the color choices you made here, really gives it a whole new personality!
Thanks Emile, I am glad you enjoyed the blog post.
Happy Uphosterying,
Kim
As an upholsterer, the new look of the chair is pretty, but the chair looks smaller in width. The seat is smaller than the original pink stripe one, even with the pink stripe one has fabric that is
vertical, but, with the solid green, the seat should have been same width and it does not look as wide as original. Is same chair? I do Quality Control on all of our pieces before delivery and this just doesn’t look like the same sized chair as original. Hope the customer liked it. I know color and fabric design makes a difference, but not this much. Thank you.
Hello Patricia, Fabrics can be deceiving sure. The seat was the same size as previously with the pink stripes and the person who purchased this piece messaged me after she got home to tell me a second time how much she loved it!
Keep up your quality control and thank you for reading my blog.
Kim
I dont care for it at all. Especially the paint job. I liked it more before. Sorry. I’ve done a ton of furniture refinishing and upholstery. I just chalk painted a 100 yr old chair for a customer. Wasnt too keen on doing that to an mahogany chair, but that’s what she wanted. Doing a good job when chalk painting isnt easy. I dont care for the rough feel. I wax and buff until its smooth as lacquer paint. Every customer I’ve done chalk finish absolutely loved the finish. That being said, to each their own.
As you said, to each his own. I love painted pieces but totally understand that some appreciate the original wood. I love to mix things up bit. This one was loved by its new owner, but thanks for reading my blogs and happy upholstering.
Kim
Your mix and match pattern choices amazes me – they work!! I’d never had made those choices. It’s great to see such a fresh new approach (well its new to me) Love the finished article.
thank you Fay!
I am glad you enjoyed the blog post.
Happy learning,
Kim
I live in London. I have 2 Louie chairs I need reaposltering.
How do I start? I am in my 77 year
My home has been destroyed by the builders. Please help!
Thank you
Jazz
Hi Jazz, I am so sorry to hear this. Our online classes has a series of beginner videos that can help you get started.
Don’t forget to take advantage of the Live Q&A sessions once you are a member.
See you on the inside,
Kim